The following tips and tricks give some helpful ideas for increasing your
productivity. They are divided into the following sections:
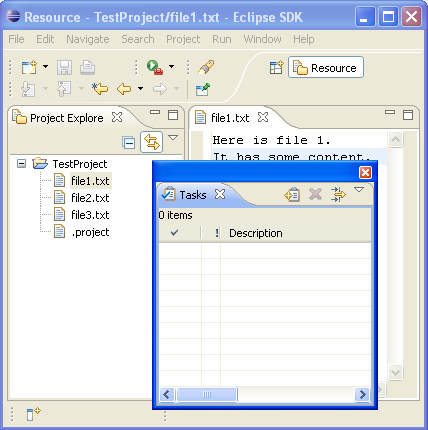
| Now, where was I? |
Workbench editors keep a navigation
history. If you open a second editor while you're editing, you
can press Navigate > Backward (Alt+Left Arrow, or the  back arrow
on the workbench toolbar) to go back to the last editor. This makes working with several open editors a whole lot easier.
back arrow
on the workbench toolbar) to go back to the last editor. This makes working with several open editors a whole lot easier. |
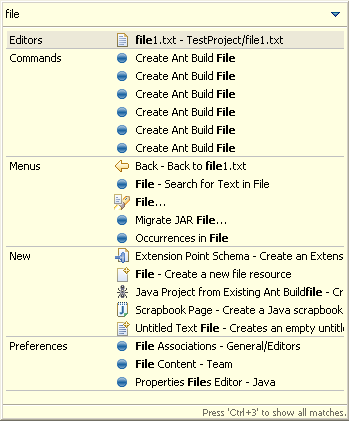
| Ctrl+3 Quick Access |
You can quickly find all manner of contributions with the Ctrl+3 binding including (but not limited to) open editors, available perspectives, views, preferences, wizards, and commands.
Simply start typing the name of the item you wish to invoke and we will attempt to find something in the Workbench that matches the provided string.
|
| Ctrl+E Editor List |
You can quickly switch editors using
the Ctrl+E keybinding which opens a list of all open editors. The list supports
type-ahead to find the editor as well as allows you to close editors using
a popup menu or the Delete key. |
| Like to start afresh each session? |
A setting on the
 General > Editors
preference page closes all open editors automatically whenever
you exit. This makes start-up cleaner and a bit faster.
General > Editors
preference page closes all open editors automatically whenever
you exit. This makes start-up cleaner and a bit faster. |
| Prevent in-place OLE editors |
By default, on Windows, OLE applications like Microsoft Word or Excel open as in-place editors inside of Eclipse.
You can force OLE applications to open as stand-alone applications by unchecking the "Allow in-place system editors" option on the
General > Editors
preference page. |
| Opening editors using drag and
drop |
You can open an editor on an item
by dragging the item from a view like the Project Explorer or Package Explorer
and dropping it over the editor area. |
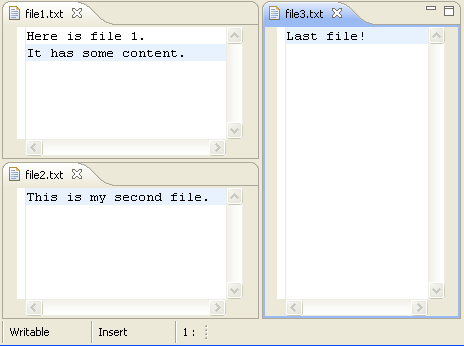
| Tiling the editor work area |
You can use drag and drop to modify
the layout of your editor work area. Grab an editor tab and drag it to the
edge of the editor work area. The arrow dock icons (e.g.,  )
indicate which way the editor work area will split. )
indicate which way the editor work area will split.
|
| Open editors with a single click |
Use the Open mode setting on the
General
preference page to activate single click opening for editors.
In single click mode, a single click on a file in the Project Explorer view (and
similar views) selects and immediately opens it. |
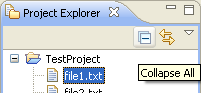
| Collapsing all open items |
Use the Collapse All button
on the toolbar of the Project Explorer view (and similar views) to collapse all
expanded project and folder items.
|
| Global find/replace
|
Use
Search > File
from the main menu to specify the text that you want to replace and the scope
in which you want to replace it. Then press Replace.... |
| Replace from Search view
|
You can replace the matches in the files by using Replace... or Replace
Selected... from the context menu in the Search view. |
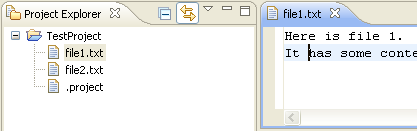
| Linking view to current open
editor |
The resource Project Explorer view
(and similar views) is not tightly linked to the currently open editor
by default. This means that closing or switching editors does not change
the selection in the Project Explorer view. Toggling the Link with Editor
button in the Project Explorer view toolbar ties the view to always show the
current file being edited.
|
| Manual editor / view
synchronization |
The Navigate > Show In
command provides a uniform way to navigate from an open editor to a view
showing the corresponding file (e.g., in the resource Project Explorer view), or
from a file selected in one view to the same file in a different view (e.g.,
from the resource Project Explorer view to the Packages Explorer view).
Typing Alt+Shift+W opens a shortcut menu with the available view
targets.

|
| Quick navigation between views,
editors and perspectives |
A look at the Window > Navigation
menu reveals a number of ways to quickly navigate between the various views,
editors, perspectives, and menus in the workbench. These commands have keyword
accelerators such as Ctrl+F6 for switching between editors, Ctrl+F7
for switching between views, Ctrl+F8 for switching between perspectives,
and F12 for activating the editor.
To directly navigate to a particular view you can define a keyboard shortcut
to a view via the
General > Keys |
| Pinning editors |
When the Close editors automatically
preference is active (found on the
General > Editors
preference page), you can stop an editor from being closed by using the
Pin Editor button which appears in the workbench toolbar.

|
| Reordering editor tabs |
You can rearrange the order of open
editors by using drag and drop. Grab the editor tab and drag it to the position
you want the editor to appear. When positioning editors, the stack icon
 indicates a valid spot to drop.
 |
| Middle Mouse Button Closes Tabs |
You can click on a view or editor tab with your middle mouse button to close
it. If you do not have a middle mouse button, try clicking on the scroll wheel if you have one. |
| Minimizing Views and Editors
|
Running out of space? Try minimizing
your unused views to reclaim screen real-estate. Each view stack contains
a minimize icon along side the maximize icon.
|
| Maximizing Views and Editors |
You can maximize a view or editor
by double-clicking on the view's title bar or the editor's tab. Double-click
again to restore it to its usual size. |
| Managing screen real estate
with fast views |
Use fast views to free up screen
real estate while keeping views easily accessible. Clicking on the icon
for a fast view temporarily reveals it over top of the other views. The
fast view retracts as soon you click outside of it. The Fast View
command in the view's system menu toggles whether it is a fast view. You
can also create a fast view by dragging a view onto the Fast View Bar
in the bottom left hand corner. |
| Fast Views and the Perspective
Bar
|
The fast view and perspective bars
may be docked in different locations, independent of one
another.
By default the Perspective Bar is located in the upper right hand corner
of the screen. It may also be docked on the top left, under the main toolbar
or to the far left. It may be moved via the perspective bar context menu
or via the
General > Appearance
preference page.
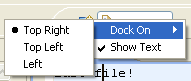
By default the Fast View Bar is located in the bottom left hand corner
of the screen. Like the Perspective Bar, it may be docked elsewhere. This
may be done by dragging the area to either the left or right side of the
screen (or back to the bottom if it is already in one of these positions).

|
| Detached Views
|
It's possible to detach a view
so that it can be placed wherever desired, including over another Eclipse
window.
Right-click on the view to be moved and select Detached from the menu.
(Alternatively, drag the view by its tab to detach the view from its position in the perspective.)
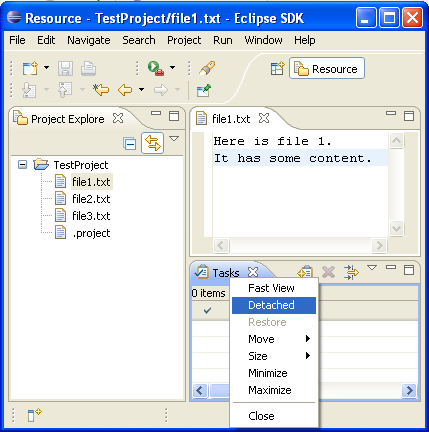
Then, place the view where you choose. You can also drag and drop other views into the same
window.
To return the view to the workbench window, use the view tab context menu's Detached function again.
(Alternatively, drag the view by its tab.) |
| Restoring a perspective's layout |
Rearranging and closing the views
in a perspective can sometimes render it unrecognizable and hard to work
with. To return it to a familiar state, use
Window > Reset Perspective.
|
User customizable
key bindings |
If you find yourself repeatedly
doing some command, you might be able to streamline things by assigning
a key sequence to trigger that command. Assigning new key bindings, and
viewing existing bindings, is done from the
General > Keys
preference page.
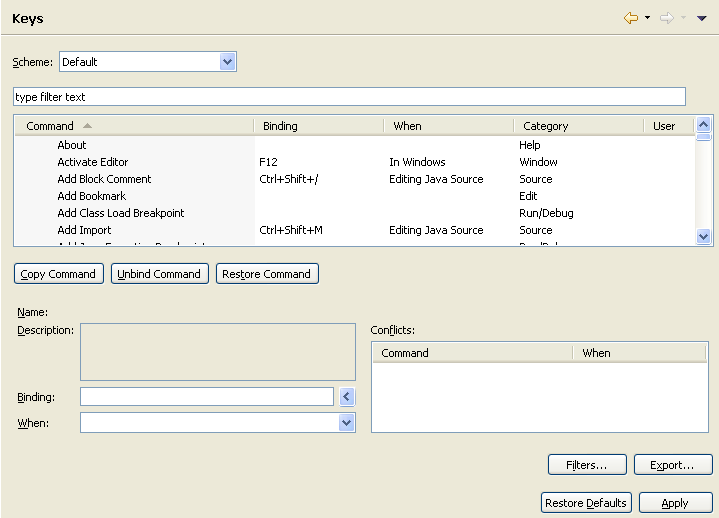
|
| View all
keyboard shortcuts |
While working with your favorite editors and
views in Eclipse, just press Ctrl+Shift+L to see a full list of the currently
available key bindings. This is a great way to learn what is available
in the UI and to speed up your productivity by learning more key bindings.
This information is also available in the improved
General > Keys
preference page.

|
| Key Binding Assistance |
Eclipse supports key bindings
that contain more than one key stroke. Examples of such key bindings are
"Ctrl+X S" ("Save" in the Emacs key configuration) or "Alt+Shift+Q Y"
("Open Synchronize View" in the Default key configuration). It is hard
to learn these keys, and it can also be hard to remember them if you don't
use them very often. If you initiate such a key sequence and wait a little pop-up showing
you the possible completions will appear.
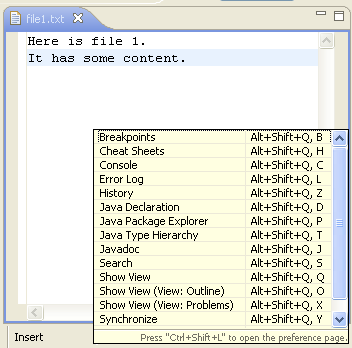
In the preferences, under
General > Keys,
there is an
"Advanced" tab. Go to this tab, and check "Help Me With Multi-Stroke Keyboard
Shortcuts". |
| Customizing toolbar and menu
bar |
You can customize which items appear
on the main toolbar and menu bar using the
Window > Customize Perspective
command.
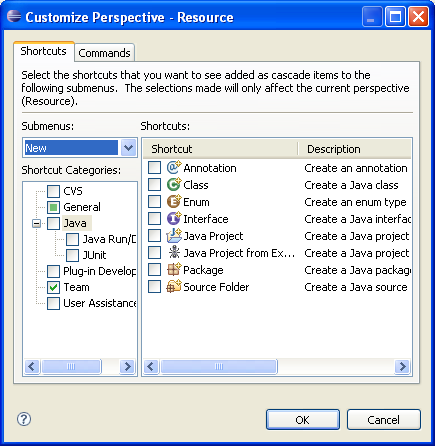
|
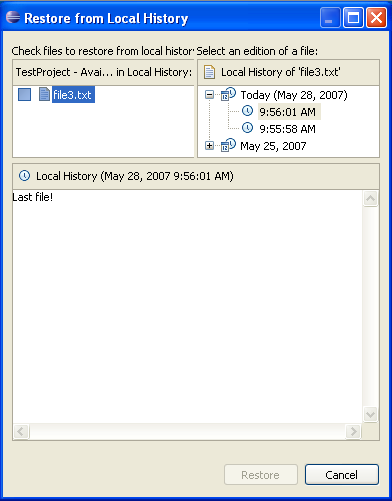
| Restoring deleted resources |
Select a container resource and
use Restore from Local History to restore deleted files. You can
restore more than one file at one time.
|
| Faster workspace navigation |
Navigate > Open Resource...
(Ctrl+Shift+R) brings up a dialog that allows you to quickly locate and
open an editor on any file in the workspace. In the same vein, Navigate
> Go To > Resource... expands and selects the resource in the Project Explorer
view itself, if it has focus. |
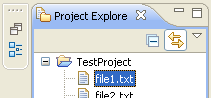
| Copying and moving resources |
You can drag and drop files and
folders within the Project Explorer view to move them around. Hold down the Ctrl
key to make copies. |
| Importing files |
You can quickly import files and
folders into your workspace by dragging them from the file system (e.g.,
from a Windows Explorer window) and dropping them into the Project Explorer view.
The files and folder are always copied into the project; the originals are
not affected. Copy and paste also work. |
| Exporting files |
Dragging files and folder from the
Project Explorer view to the file system (e.g., to a Windows Explorer window) exports
the files and folders. The files and folder are always copied; workspace
resources are not affected. Copy and paste also work. |
| Workspace project management |
Use the Project > Close Project
command to manage projects within your workspace. When a project is closed,
its resources are temporarily "offline" and no longer appear in
the Workbench (they are still sitting in the local file system). Closed
projects require less memory. Also, since they are not examined during builds,
closing a project can improve build times. |
| Describing your configuration |
When reporting a problem, it's often
important to be able to capture details about your particular setup. The
Configuration Details button on the
Help > About Product
dialog opens a file containing various pieces of information about your
setup, including plug-in versions, preference settings, and the contents
of the internal log file. You can save this, and attach the file to your
problem report. |
| Deleting completed tasks |
Use the Delete Completed Tasks
command in the Task view context menu to remove all completed tasks from
the Tasks view. This is more convenient than individually selecting and
deleting completed tasks. |
| Viewing resource properties |
Use the Properties view
(
Window > Show View > Properties)
when viewing the properties for many
resources. Using this view is faster than opening the Properties dialog
for each resource.
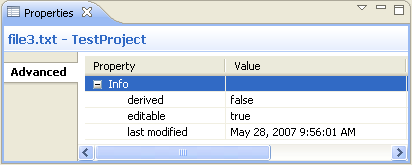
|
| Quickly find a resource |
Use the Navigate > Go To >
Resource command to quickly find a resource. If the Go To > Resource
command does not appear in your perspective, you can add it by selecting
Window > Customize Perspective,
then Other > Resource Navigation. |
| Extra resource information |
Label decorations are a general
mechanism for showing extra information about a resource. Use the
General > Appearance > Label Decorations
preference page to select which of the available
kinds of decorations you want to see. |
| Filtering resources |
The Project Explorer and Tasks views both
support filtering of their items. You control which items are visible by
applying filters or working sets. The Filters commands are found
on the view menu. The working set is selected using the Select Working
Set command in the Project Explorer view menu. In the Tasks view, a working
set can be selected from within the Filters dialog. |
| Quick fix in Tasks view |
You can use the Quick Fix
command in the Tasks view to suggest an automatic fix for the selected item.
The Quick Fix command is only enabled when there is a suggested fix. |
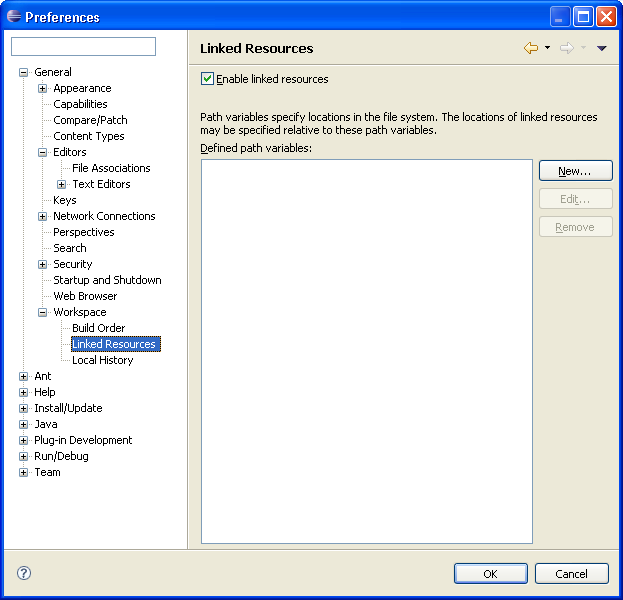
| Creating path variables |
When creating a linked folder or
file, you can specify the target location relative to a path variable. By
using path variables, you can share projects containing linked resources
without requiring team members to have exactly the same path in the file
system. You can define a path variable at the time you create a linked resource,
or via the
General > Workspace > Linked Resources
preference page.
|
| Comparing zip archives
with each other or with a folder |
Select two zip archives or one
archive and a folder in the resource Project Explorer view and choose Compare
With > Each Other from the view's popup menu. Any differences
between the two inputs are opened in a Compare editor. The top pane shows
all the archive entries that differ. Double clicking on an item performs
a content compare in the bottom pane.
This works in any context where a file comparison is involved. So if
a CVS Synchronize operation lists an archive in the resource tree, you
can double click on it in order to drill down into changes within the
archive. |
| Switch workspace
|
Instead of shutting down eclipse and restarting
with a different workspace you can instead use
File > Switch Workspace. From here you can either open previous workspaces
directly from the menu or you can open the workspace chooser dialog to choose a new one.
This trick is also useful when you change certain preferences that require
a restart to take effect (such as the
General > Appearance
preferences). To restart quickly simply switch workspaces
to your current workspace.
|
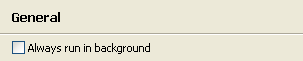
| Always Run in Background
|
Many operations can be optionally
run in the background so that you can continue working while they complete.
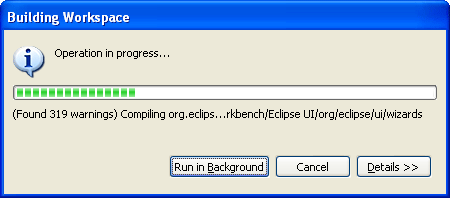
In the
General
preference page you can choose to always
run in background so that you never get the initial dialog for these operations.
|
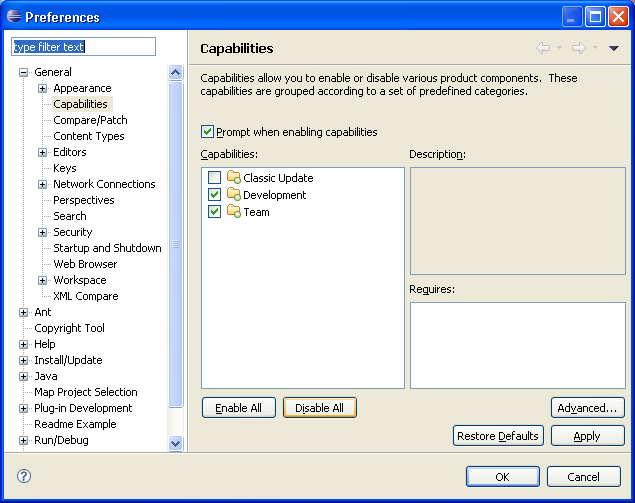
| Disabling Unused Capabilities |
If there are parts of the Eclipse
Platform that you never use (for instance, you don't use CVS repositories
or you don't develop Plug-ins) it's possible that you can disable them
from the UI entirely. Segments of the Workbench that may be filtered can
be found in the
General > Capabilities
preference page. By disabling capabilities you are able to hide views,
perspectives, preference pages and other assorted contributions.
|
|
Finding a string incrementally |
Use Edit > Incremental Find Next (Ctrl+J) or Edit > Incremental Find Previous
(Ctrl+Shift+J)
to enter the incremental find mode, and start typing the string to match.
Matches are found incrementally as you type.
The search string is shown in the status line. Press Ctrl+J or
Ctrl+Shift+J to go to the next or previous match. Press Enter or Esc to
exit incremental find mode.
|
| Go to last edit location |
Navigate > Go
to Last Edit Location (Ctrl+Q) takes you back to
the place where you last made a change. A corresponding button marked  is shown in the toolbar. If this toolbar button does not appear in your perspective, you can
add it by selecting
Window > Customize Perspective,
then Other > Editor Navigation.
is shown in the toolbar. If this toolbar button does not appear in your perspective, you can
add it by selecting
Window > Customize Perspective,
then Other > Editor Navigation. |
|
Shortcuts for manipulating lines
|
All text editors based on the
Eclipse editor framework support editing functions, including
moving lines up or down (Alt+Arrow Up and Alt+Arrow Down), copying lines (Ctrl+Alt+Arrow Up and Ctrl+Alt+Arrow Down), inserting
a new line above or below the current line (Ctrl+Shift+Enter and
Shift+Enter), and converting to lowercase or uppercase (Ctrl+Shift+Y
and Ctrl+Shift+X).
|
| Quick Diff: seeing what has changed as you edit
|
Quick Diff provides color-coded change indication
while you are typing. It can be turned on for text editors using either
the ruler context menu, Ctrl+Shift+Q or for all new editors on the
General > Editors > Text Editors > Quick Diff
preference page. The
colors show additions, deletions, and changes to the editor buffer as compared
to a reference, for example, the contents of the file on disk or its latest
CVS revision.
When the mouse cursor is placed over a change in the vertical
ruler, a hover displays the original content, which can be restored using the ruler's context
menu. The context menu also allows you to enable/disable Quick Diff. |
| Customizing the presentation of
annotations |
You can customize the presentation of annotations
in editors on the
General > Editors > Text Editors > Annotations
preference page:

|
| Next / previous navigation |
You can use Ctrl+. and Ctrl+, to
navigate to the next or previous search match, editor error, or compare
difference. These are the shortcut keys for Navigate > Next and
Navigate > Previous. |
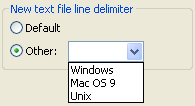
| Line delimiter support |
You can set the line delimiter that
is used when creating new text files. You can provide a single setting
for the entire workspace, using the
General > Workspace
preferences, or for a given project. In addition, line
delimiter conversions can now be applied to projects, folders, and files,
not just to the contents of a single editor.
|
| Word completion |
In any text editor you can complete a
prefix to a word occurring in all currently open editors or buffers. The
default key binding for word completion is Alt+/. (Ctrl+. on the Mac).
|
| Open untitled
files |
A text editor can be opened without creating
a file first: select File > New > Untitled Text File.
|
| CVS Watch/Edit |
The "edit" portion of
CVS Watch/Edit is now supported. Through settings on the
Team > CVS > Watch/Edit
preference page (which must be set before the projects
are added to your workspace), you can choose to automatically notify the
CVS server whenever you start to edit a file. In turn, the CVS server will
notify others on the watch list for that file. When you go to edit a file,
you are warned if there are others editing the same file. Team > Show
Editors on a file's context menu lists everyone currently working on
the file. There are also Team > Edit and Unedit commands. |
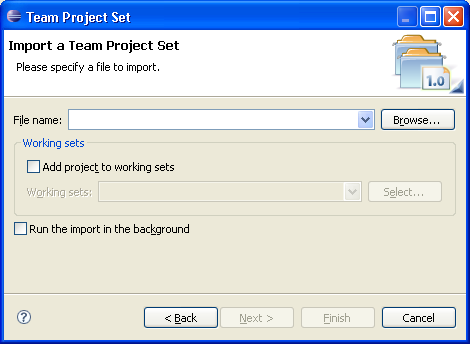
| Working set for imported team
projects |
There is an option to create a working
set for projects imported into the workspace via
Import > Team Project Set.
This works for all types of repositories.
|
| CVS now supports working sets |
Users can now define working sets
which will limit the number of projects shown in the CVS Repositories view. |
| Comparing different versions |
Select any folder or file in the
CVS Repositories view and choose Compare With from context menu to
compare it against another version, branch, or date. |
| Restoring deleted files from
CVS |
Deleted files can now be queried
and restored from the CVS repository using the Team > Restore from
Repository command, which is available on CVS projects and folders. |
| Pin a Synchronization |
You can now have multiple synchronizations
defined and available in the Synchronize View. Use the pin toolbar button
in the Synchronize View to pin a synchronization. The next time you synchronize
a new synchronization will be created. This way you can synchronize different
sets of resources. |
| Checkout Wizard |
You can now checkout projects in
one easy step via the
File > Import > Checkout projects from CVS wizard.
This also allows checking out projects from a CVS server that doesn't support
browsing of its contents. |
| Browsing changes by CVS change
set |
You can browse a set of changes
shown in the Synchronize View grouped logically by author, comment, and
date. Enable the layout by clicking on the Change Set  toolbar button. This layout can be used in the Incoming mode when synchronizing
and when comparing.
toolbar button. This layout can be used in the Incoming mode when synchronizing
and when comparing. |
Group outgoing changes
|
You can group outgoing changes into change sets
in the Synchronize View. To enable this, switch to Outgoing mode or Both mode and choose
the Change Set model from the model
selection dropdown in the toolbar.
You can then create outgoing change sets and assign changes to them. |
| Schedule a synchronize |
You can schedule that a certain
synchronization run periodically. You can schedule any CVS synchronization
from within the Synchronize View via the Schedule... action in the
view's dropdown menu. |
| Want to release changes to an
existing branch |
If you have changes in your workspace
that you would like to commit to another branch than the one currently connected
to, you can run the Team > Switch to Another Branch or Version command
and switch to another branch. This operation won't modify the changed files
and you can then commit them to the other branch. |
| Sharing your CVS lineup
with others |
You can save the
list of projects shared with CVS into a team project set. This provides
an easy way of re-creating your workspace with shared CVS projects.
- Once you have checked out the set of projects from the CVS repository,
select
File > Export
from the main menu.
- Select Team Project Set from the list and then select
the projects to be exported. The generated file can be shared with your
team to allow quick setups of your development environment.
- To import the project set select
File > Import
and select Team Project Set. The projects will be checked
out of CVS and a repository location will automatically be created.
|
| Reverting a managed CVS
file that was edited, but not committed |
There are a three
ways of doing this:
- Select the file and from the context menu select Team
> Revert to Base.
or
- Select the file and from the context menu select Replace With
> Latest from HEAD.
or
- Select the file or a parent folder and from the context menu select
Team > Synchronize with Repository.
- Next switch to incoming/outgoing mode using the toolbar button in
the view.
- Select the file and from the context menu select Override
and Update.
|
| Show ancestor pane in 3-way
compares |
Whenever a CVS synchronization
results in a conflict, it is helpful to view the common ancestor on which
the two conflicting versions are based.
You can view the common ancestor by toggling the Show Ancestor Pane
button in the compare viewer's local toolbar.

If you always want to have the ancestor pane open automatically for
conflicts, you can check the option Initially show ancestor pane
on the Text Compare tab of the Compare/Patch preference page. |
| Merge in Compare editor |
You can merge incoming changes in
the compare editor with one click. Hover over the small square in the middle
of the line connecting two ranges of an incoming or conflicting change.
A button appears that allows you to accept the change.

Note that for this the option Connect ranges with single line
on the
General > Compare/Patch
> Text Compare preference page has to be enabled. |
Content assist for branching and
merging
|
When branching and merging with CVS, you can
use content assist in the tag fields to help select an appropriate tag.
For instance, when branching, you can use content assist to pick a tag from
the list of branch tags that exist on the other projects in your workspace.
When merging, you can use content assist to pick the branch that contains
the changes you are merging. The merge wizard will also try to pick the
proper start tag for you so you do not have to pick it manually. |
Filtering in tag selection dialogs
|
There are several CVS operations that allow
you to specify a tag (e.g. Replace With Branch or Version, Compare
With Branch or Version, Checkout, etc.). These dialogs now allow you to
type in part of the tag name (or simple name filters using the * and ? wildcard
characters) and display all the tags that match what you have typed so far.
This greatly simplifies finding the desired tag when performing these operations. |
 Show
in external window button from the toolbar to view the document in the
full help window.
Show
in external window button from the toolbar to view the document in the
full help window.
 Show in table of contents button in
the toolbar.
Show in table of contents button in
the toolbar. Bookmark Document button on the toolbar of the Help browser. The
bookmarks show up in the
Bookmark Document button on the toolbar of the Help browser. The
bookmarks show up in the  Bookmarks tab.