A CVS workspace synchronization launched using the Team > Synchronize menu command or the Synchronize toolbar command in the Team Perspective will appear in the Synchronize view. This view allows you to inspect the differences between the local Workbench resources and their remote counterparts as well as update resources in the Workbench and commit resources from the Workbench to a repository.
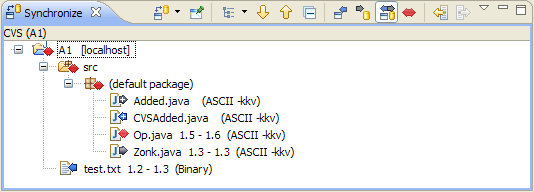
Here is what the CVS Workspace Synchronization in the Synchronize view looks like:
The following is a brief summary of some of the features of the synchronize view.
The synchronize view shows the synchronization state of resources in your workspace compared to those in the repository. This state is shown by using icons and can also be configured to show the state as text appended to the resource name. A description of the icons is shown in the table below:
 |
An incoming addition means that a resource has been added to the repository. Updating will transfer the resource to your workspace. |
 |
An incoming change means that the file has changed in the repository. Updating will transfer the new file revision to your workspace. |
 |
An incoming deletion means that a resource was deleted from the server. Updating will delete your local resource. |
 |
An outgoing addition means that the file was added to your workspace and is not yet in the repository. Adding then Committing will transfer the new file to the repository. |
 |
An outgoing change means that the file was change locally. Committing the file will transfer the changes to the repository and create a new revision of the file. |
 |
An outgoing deletion is a resource that has been deleted locally. Committing these resources will cause the remote resource to be deleted. Note: in CVS directories are never really deleted from the repository. Instead, files are deleted and empty directories are pruned from your workspace. |
 |
A conflicting additions means that the resource has been added locally and remotely. |
 |
A conflicting change means that the file has been changed locally and remotely. A manual or automatic merge will be required. Also, any entries in the view that contain children that are conflicts will also be decorated with the conflict icon. This is done to make conflicts easy to find. |
 |
A conflicting deletion means that the resource was deleted locally and remotely. |
The Synchronize view can be filtered using modes using either the toolbar actions or the menu items in the view's drop down menu. Modes can be used to show only incoming, outgoing or conflicting changes. The advantages to modes are:
Important: It is preferable to update resources in the Workbench first, resolve any conflicts that exist by merging, then commit Workbench resources to the repository.
The Synchronize view is capable of displaying different model representations of the resources. Each product may contain its own product specific representations. The Eclipse SDK comes with three models:
In addition to to the models, there is also a Flat Presentation which displays all the out-of-sync elements as top level elements.
There are several flavours of update and commit operations available in the Synchronize view. You can perform the standard update and commit operation on all visible applicable changes or a selected subset. You can also choose to override and update, thus ignoring any local changes, or override and commit, thus making the remote resource match the contents of the local resource. You can also choose to clean the timestamps for files that have been modified locally (perhaps by an external build tool) but whose contents match that of the server.
When dealing with conflicts, you can first perform an update and any conflicting changes The update operation will correctly update conflicts that are auto-mergeable (i.e. files content changes do not overlap) but will skip files that contain changes that overlap. Alternatively, conflicts can be handled using a Compare editor. A Compare editor can be opened by double-clicking (or single-clicking if you have change your open strategy in the preferences) on the conflict or by choosing Open in Compare Editor from the context menu. The Compare editor allows you to manually resolve the conflicts in the file. Once completed, perform a Mark as Merged on the conflict to indicate that you are done. This will change the conflict into an outgoing change.
The Synchronize view will show error or warning problem markers on any change that appears in the view or any folder or project that appears in the view that contains a resource that has such a problem marker. This is done to prevent resources with problems from getting committed to the repository.
This command allows you to repeat the current synchronization which refetches the remote state of the resources. The drop down of the toolbar item allows you to select other existing synchronizations or create new ones using the Synchronize... menu command.
This command allows you to pin or unpin the current synchronization. Pinned synchronizations will not be replaced by the next synchronization of the same type while unpinned synchronizations will be replaced. This allows you to keep a synchronization around for easy access. Such a synchronization will automatically update when changes to Workbench resources take place and can be configured to perform scheduled refreshes in order to keep up-to-date with the remote state of the resources.
This drop down list presents the models that can be displayed in the Sync View.
This command will go to the next difference displayed by the view. All the differences within a single file will be visited before opening the next file in the view.
This command will go to the previous difference displayed by the view. All the differences within a single file will be visited before opening the previous file in the view.
Collapse all the expanded entries in the view.
In this mode, only resources which have been changed in the repository since they were last loaded or synchronized with those in the Workbench (incoming changes) are visible.
In this mode, only resources which have been modified in the Workbench (outgoing changes) are visible.
In this mode both incoming and outgoing changes are shown, and you can both update and commit. The advantage to using this dual mode is you can do either task as you choose. The disadvantage is that performing a simultaneous bi-directional merge is often complicated.
In this mode only conflicts (resources modified both in the Workbench and in the repository) are shown.
This command updates all the incoming changes visible in the view. The command will also update conflicts that are auto-mergeable but will skip files whose contents contain conflicts.
This command commits all the outgoing changes visible in the view. Conflicts are not included in the commit.
The drop down menu allows you to pin or remove the current or remove all synchronizations, change the mode or layout, restore removed from view items, configure the current synchronization to perform scheduled refreshes as well as set other view preferences.
From the context menu of the Synchronize view you can perform a number of interesting operations.
This command open the local resource for the selected change in the default Workbench editor for the file type.
This command allows you to open the local resource for the selected change in the a Workbench editor.
This command open the selected change in a Compare editor which allows you to inspect the changes within the file.
This menu allows for renaming, deleting, moving or copying the resource.
This command refreshed the remote state of the selected resources. In addition, this command will adjust the timestamps of outgoing changes whose contents already match the contents of the corresponding resource on the server so that the file is no longer an outgoing change. This is useful in situations where build tools regenerate files whose contents have not changed.
This command removes the selected resources from the view. The resources will only reappear if the state of the removed resources changes or the Workbench is restarted or the Restore Removed Items action is invoked from the Drop Down menu.
This command expands all of the selected resource's children.
This command updates the selected resources. Conflicts can be included in an update but only auto-mergeable conflicts will be updated. Non-mergeable conflicts will be skipped and should be merged manually using a compare editor.
This command commits the selected resources. Only outgoing changes can be committed.
This command operates on conflicts and outgoing changes and replaces the local contents of those resources with the contents from the server.
This command adjusts the CVS timestamps of conflicting changes so they become outgoing changes. This command should be performed after conflicts are merged manually using a compare editor.
This command will add the selected resource to the .cvsignore list which will cause CVS to skip the resource during all CVS operations.
This command will bring up the Create Patch wizard and populate it with the selected resources.
This command will create a new branch and a new branch tag which can be used to merge the branch back to the source branch.
Depending on your Annotation preferences, this command will either bring up turn on the Quick Diff annotate or open the Annotate view for the selected resource.
This command will show the history for the selected resource..
This command will open a dialog containing all of the selected resources. You can then alter the ASCII/Binary property for each resource.

Team programming with CVS
Synchronizing with a CVS repository

Synchronizing with the repository
Updating
Resolving conflicts
Merging from a branch
Committing
Comparing resources
Merging changes in the compare editor
