Creating a project builder Ant buildfile
To see how project builders work, we will create a simple project
with a single source file and an Ant buildfile that jars up the single class file.
Though this example uses Java, it should be noted that project builders are
available for all projects, Java or otherwise.
- Create a Java project named 'HW'.
- Create a Java source file named 'HelloWorld' with a main method.
- Put a single 'System.out.println()' statement in the main method, and make
it print a greeting of your choice.
- Save changes.
- Create a file named 'projectBuilder.xml', open the Ant editor on it, enter
the following content, and save changes.
<?xml version="1.0" encoding="UTF-8"?>
   <project name="HW.makejar" default="makejar" basedir=".">

      <target name ="makejar" description="Create a jar for the HW project">

         <jar jarfile="HelloWorld.jar" includes="*.class" basedir="."/>

      </target>

</project>
- In one of the navigation views, select the HW project and choose Properties
from its context menu.
- In the project properties dialog, select Builders, then click New....
- In the Choose configuration type dialog, select Ant
build, and click OK.
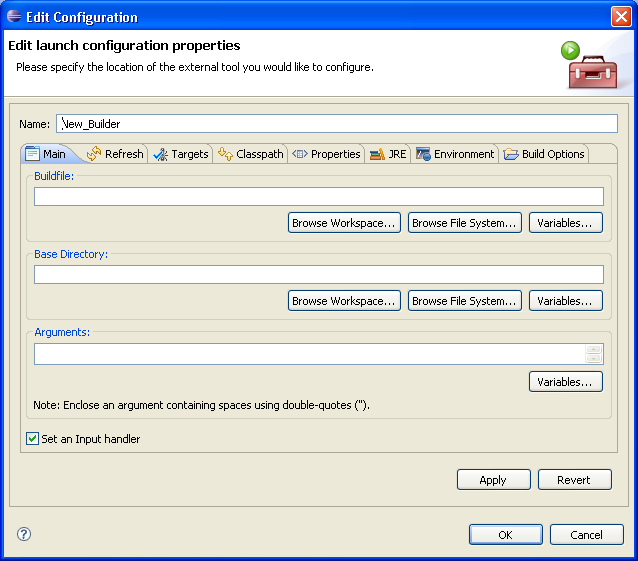
- The External Tools dialog appears. Set the name to 'Makejar'.
In the Main tab, click the Buildfile Browse Workspace...
and set the Location to be the projectBuilder.xml buildfile created
above. Then click the Base Directory Browse Workspace...
and set the Base Directory to be the HW project.
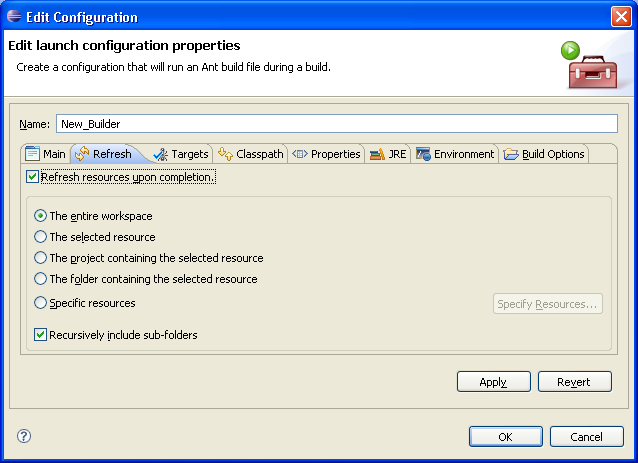
- In the Refresh tab, we want to be sure that when our HelloWorld.jar
is created, we see it in Eclipse. By default, no refreshing is done when a
project builder finishes running, so check Refresh resource upon completion,
then select The project containing the selected resource in the list
of scope variables. Because refreshing can be expensive, you should in general
refresh the smallest entity that contains all resources that will be affected
by your buildfile.
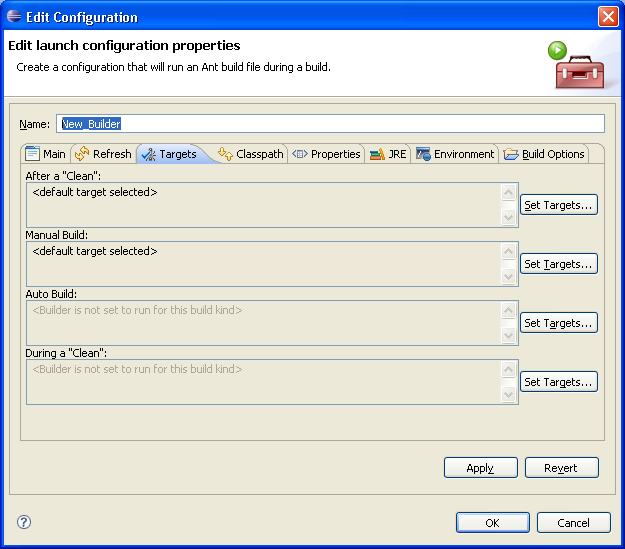
- In the Targets tab, you can specify when this project builder
is executed and which targets. By default, the default target is set to run After a "Clean"
and Manual Build. You can specify other targets and other triggers. Running your project builder
during auto builds is possible, though not recommended because of performance
concerns.
- Apply the changes and click OK.
- Back in the project properties dialog, you will now see a project builder
named 'Makejar' that is set to run after the default Java Builder. Click OK
to save the project builder and close the dialog.
Note: You can change the order so that your Ant buildfile runs before
the Java builder, though that wouldn't make sense in this example.
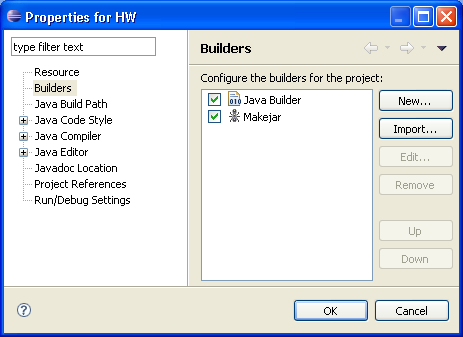
The Java Builder runs the internal Eclipse Java compiler which in
turn is responsible for indexing your source so that searching, refactoring and
many other features are available. Thus it is not possible to replace the internal
Eclipse Java compiler by using a project builder. You can disable the Java Builder and you can control
when the Java Builder runs with respect to the project builders that you define.